Sunday, September 27, 2009

Best Chocolate Chip Cookies....ever


If you google "Best Chocolate Chip Recipe Ever", there are a million that pop up. Everyone has a favorite recipe for Choco-chip cookies, and every one can tell you how amazing they are. I've had good luck with the recipe on the back of the Nestle Tollhouse bag, and that's my fail safe. After having a Ben's Cookie though (at Gateway in SLC), I have wanted to venture out to new territory in thicker and meatier cookies.

So I found this recipe.

And tried it.

And it sucked.

But the potential was there. So I tweaked it, and they turned out Awethome.

Here's the recipe:

ecipe:

  • 2 cups all-purpose flour
  • 1/2 teaspoon baking soda
  • 1/2 teaspoon salt
  • 3/4 cup unsalted butter, melted
  • 1 cup packed brown sugar
  • 1/2 cup white sugar
  • 1 tablespoon vanilla extract
  • 1 egg
  • 1 egg yolk
  • 2 cups semisweet chocolate chips

Preheat the oven to 325 degrees F (for pure convection, adjust accordingly; I used 310 F on convection). Grease cookie sheets, or line them with parchment paper or use a Silpat (which is what I did).

Sift the flour, salt and baking soda and set aside.

Mix the sugars and butter just until thoroughly mixed, then add egg, yolk and vanilla and mix until creamy. Add the sifted ingredients and mix until just blended.

Stir in the chocolate chips/chunks, then drop dough 1/4 cup at a time on a cookie sheet, about 3 inches apart, and bake for 15-17 minutes. Leave them on the cookie sheet to cool a bit when removed from the oven (this is important… they fall apart if you move them too quickly). Once they cool a few minutes, remove the cookies to a cooling rack to finish cooling. Or eat them right away, with milk!

I got the recipe from HERE.

Here's what I think helped:
When I mixed the butter & sugars together, til thoroughly mixed. Then, added the egg, egg yolk, and vanilla, and beat it for a couple of minutes until it was pretty "creamy" like they said, but also a little lighter. Like this:
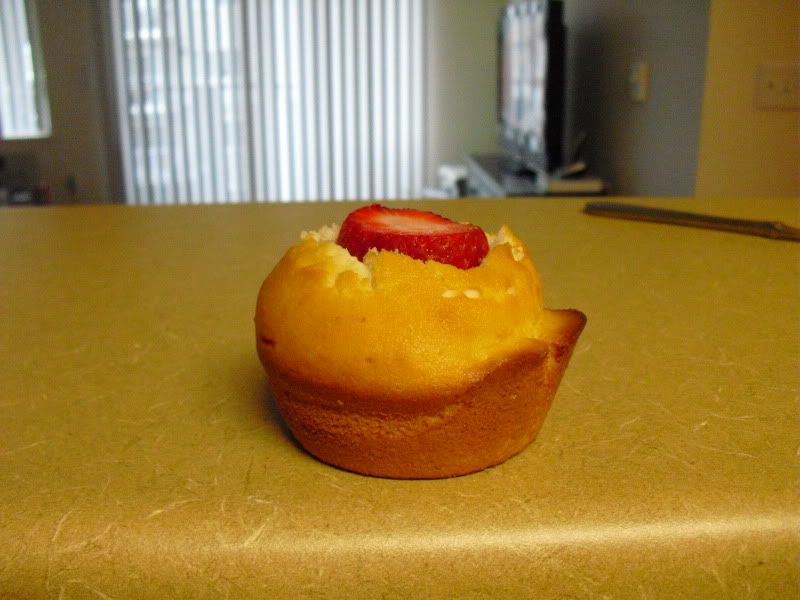
Also, I added a little more flour and about a 1/4 teaspoon of extra baking soda. The last batch I made fell, and looked like flat discs. These turned out a lot better.

I found a 1/4 measuring cup that was rounded and worked great. They turn out to be BIG cookies. They said to space it out 3", how the heck do you do that? I winged it. (Is winged a word?)
They turned out like this:
So yummy! Perfectly crisp on the outside, really soft on the inside. Cade and I had to have one right out of the oven and they kind of fell apart they were so soft. I'd recommend letting them sit about 15 minutes to "set", and become perfect.
I can't believe they turned out this great. I was so surprised. Woot for chocolate chip cookies! I finally redeemed myself after the last 2 failed attempts at making cookies for my hubby.

Monday, September 21, 2009

I promise this isn't a cooking blog


I've got some other crafting stuff coming up, but had to share this yummy fall apple recipe! There's a fantastic pick your own fruit place here that I can't wait to visit, and I can't wait to use all of these apples in different ways. This is a great way to use up Granny Smith apples, as well as a quick dinner fix.

Ingredients:
Puff Pastry (I always have this on hand. It's amazingly delicious)
Munster Cheese
Sliced Turkey
Sliced Granny Smith Apples
Honey Mustard

Thaw the puff pastry til you can work with it. Place the first puff pastry shell on a cookie sheet. Perhaps roll out a little bit to make it a little bigger. Spread honey mustard on puff pastry, leaving at least a 1/2" around the edges.

Layer turkey, cheese, and granny smith apples.

Then cover with second puff pastry shell, and crimp edges. If you'd like, you can put an egg wash on it to make the top a bit more crusty. Cade did. And I'm glad. Bake at 400* til just a little darker than golden brown (this lets the crust bake and cheese melt).
It turns into this deliciousness. It's crispy, flaky, gooey, and awesome. You'd think the apples in it would make it sweet, and it does a little, but it's a good mix. The tartness mends well with the thickness of the munster cheese. I love these flavors!

We cut it into slices and devour. I'm ashamed that there wasn't any left.

It's like a pillow of goldeny goodness. I know this looks a bit dark, but it's great. You have to try it as one of your easy night meals! You can use this same combo with some crusty bread to make paninis (we don't have a panini press, but use our George Foreman. Yeah, we're ghetto). Apples + Turkey + Munster Cheese= Awesome!

Sunday, September 20, 2009

Dinner Rolls

There's something about yeast that fears me. When it hears me speak of cinnamon buns, homemade bread, or anything else requiring its life, it shivers in its little baggy saying "Please not me! Please not me!" I think it fears a life wasted on bread that turns out like cinder blocks. Oh believe me, I think word has gotten around in the yeast community that I'm a "yeast killer". And thus, they perform even more poorly for me than they would have if they knew they would be baked into something beautiful.

In order to become a better housewife, and put yeast's fears at ease, I signed up for a bread baking class through church. Knowing that a sweet old lady would walk me through the process made me excited, even giddy. If a lady has been working the bread world for longer than I've been alive, I have a lot to learn from her. She gave us some great secrets, let me feel the dough to see what consistency it'd be, and even let us try some samples she'd made. I'd never seen rolls so light. EVER. They were fluffy and amazing. I knew this sister had to be an angel from Heaven.

So I got home, excited, motivated, and encouraged. I started going. And Going. And, I think we got it.
Not quite and fluffy as Mary's, but I'll take it as a first attempt. I practically accosted her in Relief Society today, saying "They didn't turn out quite so fluffy, what did I do?!" To which she sweetly replied, "Try more yeast. And have patience deary, you probably didn't let the dough rise long enough. It takes a while". This lady has known me 24 hours and already knows how impatient I am. Smart girl!
I rolled them into crescent shapes, although you can do them in several different ways. However you do your dinner rolls.
It yields about a dozen rolls, but you can double, triple, or quadruple the recipe to fit your hungry family's needs. We downed these within 12 hours. Yeah. Locke loved them the most though.

Here's the scoop:

Ingredients:
1/2 c hot water
1/4 c butter, softened
1 egg
2 c bread flour, mixed w/ 2 1/2 T powdered milk
2 T sugar
1 tsp. salt
2 tsp. yeast

Mix dry ingredients together (I asked her today, because her recipe was unclear, but you can mix ALL dry ingredients [yeast, sugar, salt, everything] together).

Sift & mix together with fork to lighten it. Mix together wet ingredients, and add flour mixture (I put about a 1/2 cup at a time into my mixer).

Pour onto floured surface, knead lightly adding just enough flour to make it not too sticky (here's where my issue came to pass. I was always adding WAY too much flour. As in, the dough wasn't sticky at all, had already absorbed to where it wouldn't take anymore flour, etc. This has the consistency of a "wrinkly elbow" as I once heard. It's still pretty sticky, but not to where it'll gum up your fingers). Knead into a ball, and let rise to double. Then punch it down, and allow it to rise again.

Pour onto floured surface, knead for a few minutes. Roll out into a circle (think pizza), about a 1/4" thick. Cut into 12 pieces (like a pizza pie!), then roll into crescent rolls(from big side to small side).

Place on cookie sheet and let rise for a while. I think this was also a fatal mistake. I should have let them rise for a little while.

Bake at 350 for 15 minutes or until lightly brown.

Some tips I learned at the class:
-You want to keep your dough warm, unless you're refrigerating it. If you do refrigerate it, let it come to room temp before working with it. It makes it easier.

-Patience, child. I'm awful at patience. I need to work on that.

-Sometimes you just need a little more yeast. And love.

-Don't over flour. I do this. All. The. Time. I need to stop. And have a leap of faith.

-Dough enhancer is really great, especially for bread. I gotta get some of this.

-Bread flour is not the same as regular flour. It's worth the investment.

Try it out! You won't be disappointed. As Mary said yesterday, it's all about practice practice practice! If a yeast hater like me can do it, anyone can!

Saturday, September 19, 2009

Strawberry Cupcakes

I picked up this recipe for cupcakes when a friend of mine had a baby and we wanted to take her a treat. How do you justify bringing cupcakes to a new mom of a baby? Well, I don't think it needs any justification at all! I've since used these for get togethers and most recently our birthday party. I had a package of strawberries sitting in the fridge and felt the urge to have this summertime treat one more time before fall rolls in.

Whatcha need:
1 box vanilla cake mix (any kind, I prefer the cheap stuff though)
Fresh Strawberries
Frosting of choice

Simple, right? I feel like this is more of a craft than a recipe. I mean, it's more of an assembly process than a cooking one.

First, cook your cuppy cakes. I neglected to pick up cupcake wrappers, so mine are nekked.
Next, hollow out the cupcake by cutting a cone shape out of the top with a paring knife. Think about it, you're stuffing a strawberry in there, so you're trying to make it in the shape of a strawberry. I know, I feel stupid explaining this to you. It's really not that complicated. Oh yeah. Feel free to eat the innards.
Next, put a strawberry in there. Yep. Just slide it right in. Of course, you want to cut the top of the strawberry off first. You can play the "matching" game, by matching the bigger strawberries with the bigger cupcakes,etc. It should fit snug. If it doesn't fit all the way, give it a little push. Cupcakes are squishy. It will make room for the strawberry goodness. I've also been known to trim the strawberry top to fit flush with the cupcake. I feel really silly saying this. It's not rocket science. I promise.
Next, add frosting of your choice. I use a cream cheese/buttercream frosting. (In truth, Cade made the frosting for this one while I was out burning off all of the cupcake innards I ate. Yeah. There were a lot of calories in the middle of those suckers). Simplest way to frost these. Ever. Put the frosting in a zippy bag, cut a tip off, and use it like a piping bag in a swirl to cover the strawberry, and make it look purty.


Nice right?

Oh, but it gets better. Much better.

That's the middle of your cupcake. I searched the food network website to find this "recipe", so I could give credit where credit's due, but I guess Sandra Lee had to make room for things like her Kwanzaa Cake. You missed out on a good one Sandra. But I'm getting the last laugh. Or bite. Or whatever. It's tasty, and you should make them!

Monday, September 14, 2009

Modge Podge


I'm officially addicted to Modge Podge. Do they have like a 10 step program for this stuff? I thought I liked paste in Kindergarten, but man oh man, Modge Podge is like paste on acid. Not only does it glue things together, it also makes a wicked finish.

It started when I decided to decorate my son's room a bit. We used to live in a one bedroom apartment, where the boy shared a room with my husband and I. We didn't really have much for him in our room decoration wise, so when we moved into a 2 bedroom apartment he was left with bare walls. Armed with a bottle of modge podge, some paper, and a $1 bag of clothespins, I set to work.

The clothespins. I didn't do any cohesive pattern or color scheme. I do have leftovers though, so perhaps that'll be my next project.
I hung photos with the finished clips on photo wire.
And now little boy has something hanging in his room, that not only looks fun but has photos of all of his loved ones and friends. I hope to put up some of his drawrings as well as cards and mail he gets from friends and family.

Well. What do you do with a perfectly good bottle of modge podge leftover from said clothespin project?

Make more clothespins.

I'll put magnets on the back of these and give them as gifts. Um, whoops. I mean, I'm NOT giving them as gifts...so please forget you ever saw these.


I remembered I had some frames that were a little scratched, dull, or otherwise non-display-able.

And those become podged as well.


I like the red on black. My hubby gave me a huge packet of paper for Christmas last year, and I haven't been able to find anything to use this for. Until now!

I think this one turned out best. I love the contrast of red and black.
I'm not giving this as a gift either. No. So don't even be thinking that I would. Because I wouldn't...Especially not for a birthday/wedding/congratulations. Nope.

Saturday, September 12, 2009

Spokrafty


Here I am, in a city 719 miles away from family and friends. Here I am, with a husband in law school and a rambunctious 2.5 year old who loves to jump, run, and exert energy. Here I am, a woman needing an outlet to express creativity and share her creations.

And so, I became Spokrafty.

I love reading all of the great craft ideas the internet has to offer. I love seeing all the things ladies are coming up with out there, to not only beautify their homes but share their talents. I can in no way guarantee beautiful work as amazing as others you might find, but I can guarantee something:

It'll be cheap.

With the hubs in law school, there's not many extra green backs floating around. What used to be a crafting hobby that consumed a few dollars here and there, has turned into a "let's see how much we can stretch what we already have" craft originality session.

The crafts I present to you are quick, fun, and cheap...like good takeout.

So get Spokrafty in Spokompton, and grab a Diet Coke for me will ya?